Setting Up Hammer
There are two ways to set up Hammer for Counter-Strike now. One is for the CS 1.5 and older versions, and the other is for Steam CS 1.6 and newer.
I would like to thank Mobiltune, from counter-map for providing the Set up Guide for Steam.
Setting up Hammer for 1.6 /Steam by Mobiltune
Okay, this tutorial will show you how to update your pathnames and some other extra bits so Hammer will be set up for Steam and CS 1.6. This mostly consists of updating pathnames and parameters and adding the 1.6 FGD.
- Preparation
a) First, we probably should download the 1.6 FGD. It is not necessary, but if you want to use the new entities like env_rain, you might want it. You can download it from http://www.slackiller.com/tommy14/CSfgd.htm
b) Unzip this FGD, and move it to your Hammer folder that should be something like this: "C:\Program Files\Valve Hammer Editor\FGD\counter-strike"
c) The actual location of the Hammer folder may vary depending on where you installed Hammer, but this is the default value.
d) Next you should download a file called GCF Scape, from http://countermap.counter-strike.net/Nemesis/ and unpack your counter-strike.GCF file to the "C:\Program Files\Steam\SteamApps\[[email protected]]\counter-strike" folder
e) You will also need to grab the ZHLT Compile tools from www.zhlt.tk
- Game Configurations Tab
a) Open Hammer or WC and go to Tools on the top menu bar.
b) Under Tools, click Options, and the options window should open up.
c) Click the Game Configurations tab.
d) The Configuration should be set to CS, if it is not click edit, then click add, and type CS.
e) On to Game Data Files, Whatever FGD you have there, select it and hit remove (if You don’t have any don’t worry).
f) Click Add, and browse to the 1.6 FGD (or your original FGD) we just added. The other stuff hear is either unchangeable or just a preference, until we get to Game Executable Directory.
g) The Game Executable Directory should be like this: "C:\Program Files\Steam\SteamApps\[[email protected]]\counter-strike"
h) Next is the Mod Directory, which should be like this: "C:\Program Files\Steam\SteamApps\[[email protected]]\counter-strike\cstrike"
i) Now onto the Game Directory which we will set the same as Game Executable Directory: "C:\Program Files\Steam\SteamApps\[[email protected]]\counter-strike"
j) Lastly, we have the RMF Directory. Now this actually doesn't really matter. It is just simply the place where your map base files, the RMF files, are stored. This could be a folder in my documents, or you could use the supplied folder with Hammer. If you want to use Hammer 's provided folder, the RMF Directory should be set like this: "C:\Program Files\Valve Hammer Editor\maps", how ever don’t make your RMF Directory your counter-strike maps Directory.
Now that’s done, you should have your tab looking like this
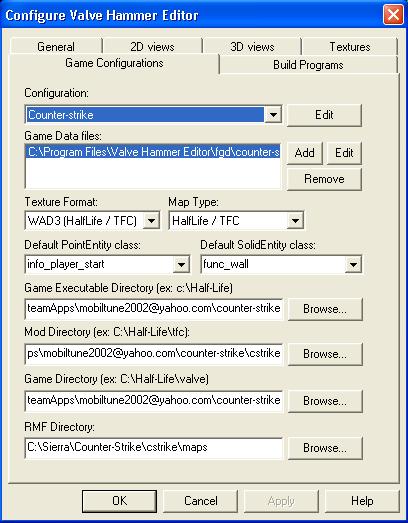
There, finally, the Game Configurations tab is all set.
- Build Programs Tab
a) OK, first, set the configuration to CS; if you did it correctly it should be a choice in the pull down menu.
b) Next, we have Game Executable, this would be the actual game program, normally, Counter-strike.exe; however, there is a problem. We cannot set Game Executable to Counter-strike.exe for 2 reasons. Foremost, CS.exe does not even exist anymore. Now, you might just think well, we can set it to HL.exe then. Wrong. The fact of the matter is, we can no longer make CS start automatically, because it is started from steam, so if we set it to HL.exe, all that happens is we get multiple steam installations (not good, one steam is enough anyway). So what I 'm getting at in a very oddly drawn out way is that we leave this, Game Executable, Blank. Don 't type anything there.
c) Right, now we are going to move onto the CSG executable. If you put your tools in the correct place, and your using ZHLT, it will look like this: "C:\Program Files\Valve Hammer Editor\tools\HLCSG.exe"
d) BSP Executable will look like this: "C:\Program Files\Valve Hammer Editor\tools\HLBSP.exe"
e) VIS Executable will look like this: "C:\Program Files\Valve Hammer Editor\tools\HLVIS.exe"
f) And RAD Executable will look like this: "C:\Program Files\Valve Hammer Editor\tools\HLRAD.exe"
g) OK, last option, Place Compiled Maps in This Folder Before Running Game. This one is probably the only one that changed on this whole tab. We want our .BSP maps to go into our steam directories so we can play them right? Right, so we are going to set this value to: "C:\Program Files\Steam\SteamApps\[[email protected]]\counter-strike\cstrike\maps"
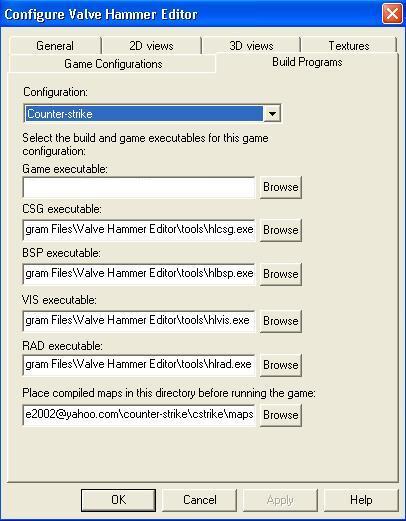
Wow, ok guys, we 're almost done!
- Textures Tab
a) Remember how we copied all the .wad files into the steam cstrike folder? Well, now we need to add them to Hammer. Also, if you have any wads listed in the Texture file window, select them and hit remove. Now hit Add Wad, and browse to: "C:\Program Files\Steam\SteamApps\[[email protected]]\counter-trike\cstrike"
b) Add a wad. Repeat until you add all the wads you need to make your map. (Warning: Do not add more than 8 wads. This can sometimes cause your map to have strange errors whilst compiling.).
c) After you finish adding your wads, hit "Apply", then "OK" at the bottom of the Options window.
YAY! We 're done, and all ready to begin mapping for Steam /CS 1.6, and now we are able to use the cool new entities like env_rain and env_snow! Hooray!
NOTE: I Just want to add this here -
There is a way to launch CS (steam) through your compiler. I did not originally include it because I did not want any confusion, but if you think you can do this, then by all means go ahead and do it!
a) Under the Game Configurations, set your game executable for steam.exe.
b) Then, hit apply, ok, and then go to File>Run (f9).
c) Make sure you’re on expert compile!
d) Find the $game_exe command.
e) Add these parameters: -applaunch 10 +map $file
f) Then you may add your other parameters like -dev and -console.
How it works
- First, after compile, it will run the game executable to launch Steam.exe
- What -applaunch 10 does is select your actually game within steam. Applaunch 10 is Counter-Strike, therefore CS launches.
- Now +map adds the command "map" to the console, then $file gets replaced with the name of the compiled .BSP.
So in conclusion, this will automatically launch steam, launch CS, starts a game, and loads your map up for you. Great eh?
Special thanks to [DNV]-Cross-whom without his combined effort; this would not have been discovered!
Setting Up for Won
The first steps well want to follow in building our new world is to set up hammer. If this is your first time opening up the Hammer, then you will be asked to use the set up guide. You can of course use this guide, though I have also supplied a Guide, to setting up hammer in full for Counter Strike.
- Preparation
a) First, we probably should download the 1.6 FGD. It is not necessary, but because it’s the most recent version of the FGD, it will have fewer bugs, and the latest options included in it. You can download it from http://www.slackiller.com/tommy14/CSfgd.htm
b) Unzip this FGD, and move it to your Hammer folder that should be something like this: "C:\Program Files\Valve Hammer Editor\FGD\counter-strike"
c) The actual location of the Hammer folder may vary depending on where you installed Hammer, but this is the default value.
d) Next you should download the latest build of ZHLT, these turn your raw .RMF file into a playable .BSP file. You can grab them from http://www.zhlt.tk
e) Unzip, the ZHLT file to: "C:\Program Files\Valve Hammer Editor\tools\"
Now that’s done, lets move onto the Game Configurations Tab
- Game Configurations Tab
a) Open Hammer or WC and go to Tools on the top menu bar.
b) Under Tools, click Options, and the options window should open up.
c) Click the Game Configurations tab.
d) The Configuration should be set to CS, if it is not click edit, then click add, and type CS.
e) On to Game Data Files, Whatever FGD you have there, select it and hit remove (if You don’t have any don’t worry).
f) Click Add, and browse to the 1.6 FGD we just added. The other stuff hear is either unchangeable or just a preference, until we get to Game Executable Directory.
g) The Game Executable Directory should be like this: "D:\Sierra\Half-Life”
h) Next is the Mod Directory, which should be like this: "D:\Sierra\Half-Life\cstrike"
i) Now onto the Game Directory, should look like this: "D:\Sierra\Half-Life\valve"
j) Lastly, we have the RMF Directory. Now this actually doesn't really matter. It is just simply the place where your map base files, the RMF files, are stored. This could be a folder in my documents, or you could use the supplied folder with Hammer. If you want to use Hammer 's provided folder, the RMF Directory should be set like this: "C:\Program Files\Valve Hammer Editor\maps", how ever don’t make your RMF Directory your counter-strike maps Directory.
Now that’s done, you should have your tab looking like this
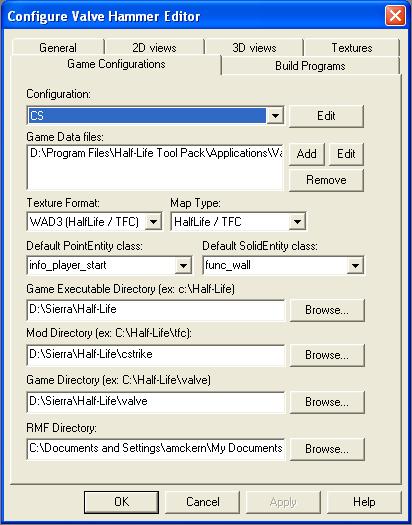
There, finally, the Game Configurations tab is all set.
- Build Programs Tab
a) OK, first, set the configuration to CS; if you did it correctly it should be a choice in the pull down menu.
b) Next, we have Game Executable, this would option should look like this: “D:\Sierra\Half-Life\hl.exe”
c) Right, now we are going to move onto the CSG executable. If you put your tools in the correct place, and your using ZHLT, it will look like this: "C:\Program Files\Valve Hammer Editor\tools\HLCSG.exe"
d) BSP Executable will look like this: "C:\Program Files\Valve Hammer Editor\tools\HLBSP.exe"
e) VIS Executable will look like this: "C:\Program Files\Valve Hammer Editor\tools\HLVIS.exe"
f) And RAD Executable will look like this: "C:\Program Files\Valve Hammer Editor\tools\HLRAD.exe"
g) OK, last option, Place Compiled Maps in This Folder Before Running Game, so we are going to set this value to: "D:\Sierra\Half-Life\cstrike\maps"
Wow, ok guys, we 're almost done!
- Textures Tab
a) Remember how we copied all the .wad files into the steam cstrike folder? Well, now we need to add them to Hammer. Also, if you have any .WAD listed in the Texture file window, select them and hit remove. Now hit Add Wad, and browse to: "D:\Sierra\Half-Life\cstrike"
b) Add a file named HalfLife.WAD found in “D:\Sierra\Half-Life\valve”
c) After you finish adding your .WAD files, hit "Apply", and then "OK" at the bottom of the Options window.
You can add more Wads at a latter time, but at the moment to may wads, will get you confused, so lets leave it at one at the moment.
![]()
Please email me if there is anything wrong, unclear, or that simply does not work. Thank you!
![]()