Advanced Texturing and Alignment
So far, most of the texturing that you 've done has been relatively simple, but hammer supports more intricate texture work as well, both on a brush-by-brush level and on a face-by-face level. You can see how to texture whole brushes, as well as how to texture single faces. You will also learned to select a texture off of a face without having to find it in the Textures list.
Even when you follow all the rules of good brush layout and level design, some textures don 't line up where you want them to be when you first apply them. Either the textures edges don 't line up with the edges of the brush, the only texture that has the symbol you want on it is too large, or a crate is rotated off the grid and its textures are not.
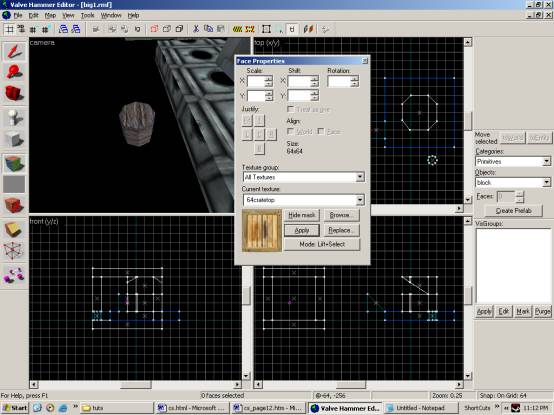
This section will show you how to scale, rotate, offset and flip textures. Get a good view of the main ground brush in the camera view port. Then select the Texture tool hot key shift + a
This tool has 6 different options detailed below
Lift and Select
The default Texture application tool option, this option lifts a texture, and also selects its face in 3d view.
Lift
The same as Lift and select, though it dose not chose the face
Select
The same as lift and select, though it only chooses the face
Apply texture only
Applies the current texture in the thumbnail to the face, ignoring any custom values set in the options above
Apply texture and values
Applies the texture and values to the face, with the currant thumbnail texture
Align to view
Aligns the currant thumbnail texture to the face, with the currant view angels in the camera view
You can use the texture application tool in any of the 4 view ports, though working in 3d texture view is easier to see what is happening. You can also use the Texture Application tool, in free look mode, as clicking an object will apply the currant option to that brush.
For instance, a texture may perfectly fit the brush but hang a little off centre: say, 4 pixels too low and 8 pixels too far to the left. To correct this, you would add to the X and Y values. Setting the X value to 8 would move the texture 8 pixels across the face to the right, and setting the Y value to -4 would move the texture up 4 pixels on the face.

This isn't something you want to use for all of your textures; its much better to build such that the bulk of your textures fall naturally along brush boundaries so that you don 't even need to think about texture alignment on most of your brushes. Its meant to be used for detailed, standout objects like crates, signs and display screens which are often set at odd locations and need to be exactly aligned.
The next control, the Rotation control is what you use to align a texture on a brush that 's been rotated. Perhaps you've made a poster that 's hanging on a wall at a slightly weird angle of 17 degrees to make the room look a little unkempt. By applying a 17 degree rotation to the texture of the poster, you can get the poster to look as it should, properly lined up on the brush.
The next controls are the X and Y scaling controls. By default, these are each set to the horizontal and vertical size of the texture on the current face in pixels. However, by changing these values you can change the size of a texture in the world. By modifying just one of them (say, doubling the value in the U scale) you can stretch the texture. By doubling both of them, you quadruple the size of the texture on the brush. Lastly, you can flip a texture without rotating it by putting a negative value into either of these boxes. There are many cases where mirroring a texture can be useful: aligning trims on a wall, building a fake mirror image of a screen, and giving a clue to a secret door. The dialog also has two Flip buttons that allow you to do the same thing.
Finally, there are two check boxes. When you click the Texture Lock hot key SHIFT + L, hammer will attempt to hold the textures aligned to the brush 's faces as they currently are. This allows you to move the brush around without the texture sliding around on the face. Hammer will try to automatically update the textures’ offsets and even rotation to keep the faces. Although hammer doesn't always make the right choices, for simple moves and simple rotations it can be faster than doing the math for your-self.
![]()